Preamble
This blogspot exhibits many of my students outputs from a variety of workshops. There are one, two and five day workshops as well as workshops that have a different focus. Nevertheless, it always surprises me how much I learn from my students and how enthusiastic they are to learn and so for your convenience, I have listed the workshop posts below.
Visual Communication and Design (The University of Newcastle Multi-Media Course).
The University of Newcastle (Newcastle and Ourimbah Campuses, NSW, Australia) 2008 to 2010.
In Pursuit of ArtCloth:Improvisational Screen Printing Workshop
The Australian Textile Arts & Surface Design Association Inc. Sydney, NSW.
One and Two Day Disperse Dye Workshops
Various Textile Groups (Australia) 2008 - 2011.
Five Day Workshop - In Pursuit of Complex Cloth
“Wrapt in Rocky” Textile Fibre Forum Conference (Rockhampton, Queensland, Australia) 29th June to 5th July 2008.
Five Day Workshop – In Pursuit of Complex Cloth
Orange Textile Fiber Forum (Orange, NSW, Australia) 19th to 25th April 2009.
5 Day Workshop – In Pursuit of Complex Cloth
Geelong Fiber Forum (Geelong, Victoria, Australia) 27th September to 3rd October 2009.
Two Day Workshop - Deconstructed and Polychromatic Screen Printing
Beautiful Silks (Melbourne, Victoria, Australia) 20th to 21st March 2010.
Five Day Workshop – Disperse Dye and Transfer Printing
“Wrapt in Rocky” Biennial Textile Forum/Conference Program (Rockhampton, Queensland, Australia) 25th June to 1st July 2010.
Two Day Workshop – Improvisational Screen Printing
ATASDA (Sydney, NSW, Australia) 28th to 29th August 2010.
Two Day Workshop – In Pursuit of Complex Cloth (Day One)
”Stitching and Beyond” Textile Group (Woodbridge, Tasmania, Australia) 2nd to 3rd October 2010.
Two Day Workshop – In Pursuit of Complex Cloth (Day Two)
”Stitching and Beyond” Textile Group (Woodbridge, Tasmania, Australia) 2nd to 3rd October 2010.
Advance Silk Screen Printing
Redcliffe City Art Gallery Redcliffe, Queensland, Australia) 10th April 2011.
One Day Workshop - In Pursuit of Complex Cloth
The Victorian Feltmakers Inc. (Melbourne, Victoria, Australia) 14th May 2011.
One Day Workshop - In Pursuit of Complex Cloth (Felted and Silk Fibers)
Victorian Feltmakers Inc (Melbourne, Victoria, Australia) 15th May 2011.
Five Day Workshop – Disperse Dye and Transfer Printing
SDA (Minneapolis, Minnesota, USA) 13th to 17th June 2011.
Five Day Disperse Dye Master Class – Barbara Scott
Art Quill Studio (Arcadia Vale, NSW, Australia) 15th to 19th August 2011.
Five Day Workshop – Disperse Dye and Transfer Printing
Fiber Arts Australia (Sydney, NSW, Australia) 26th September to 1st October 2011.
One Day Workshop – Improvisational Screen Printing
Newcastle Printmakers Workshop Inc. (Newcastle, NSW, Australia) 5th November 2011.
One Day Workshops – Low Relief Screen Printing
Various classes within Australia.
Two Day Workshop – Disperse Dye and Transfer Printing
ATASDA (Sydney, NSW, Australia) 23rd to 24th June 2012.
MSDS Demonstration at Zijdelings
(Tilburg, The Netherlands) October, 2012.
Five Day Workshop - Disperse Dye and Transfer Printing
Fibre Arts@Ballarat (Ballarat, Victoria, Australia) 6th to 12th April 2013.
Two Day Workshop - Disperse Dye and Transfer Printing
EFTAG (Tuross Head, NSW, Australia) 13th to 14th April 2013.
Two Day Workshop - Disperse Dye and Transfer Printing
Zijdelings Studio (Tilburg, The Netherlands) 9th to 10th October 2014.
PCA - Celebrating 50 Years in 2016
Art Quill Studio 2016 Workshop Program (Newcastle, Australia).
Image Dreamings: Basic Silk Screen Printing Workshop - Part I
2016 Art Quill Studio Workshop Program (Newcastle, Australia).
Image Dreamings: Basic Silk Screen Printing Workshop - Part II
2016 Art Quill Studio Workshop Program (Newcastle, Australia).
In Pursuit of: Improvisational Screen Printing Workshop
2016 Art Quill Studio Workshop Program (Newcastle, Australia).
In Pursuit of: Low Relief Screen Printing (LRSP) Workshop 2016
2016 Art Quill Studio Workshop Program (Newcastle, Australia).
Art Quill Studio 2017 Workshop Program
2017 Art Quill Studio Workshop Program (Newcastle, Australia).
In Pursuit of: Low Relief Screen Printing (LRSP)
2017 Art Quill Studio Workshop Program (Newcastle, Australia).
In Pursuit of Complex Cloth: Layered Printing Approaches
2017 Art Quill Studio Workshop Program (Newcastle, Australia).
Melding Experiences: New Landscapes Using Disperse Dyes and Transfer Printing.
2019 Art Quill Studio Workshop (NCEATA, Newcastle, Australia).
In Pursuit of ArtCloth: Disperse Dye and Transfer Printing Workshop
2022 Two Day Workshop (ATASDA, Sydney, NSW, Australia).
Image Dreamings: Basic Silk Screen Printing on Cloth Workshop
2025 Two Day Workshop (Newcastle Printmaker's Premises, Newcastle, NSW, Australia).
Introduction
For over two decades I have been experimenting and working with hand printing techniques using disperse dyes on synthetic/polyester fabrics. These experiments led to my signature technique that I have developed and named - MultiSperse Dye Sublimation (MSDS). I have been teaching my MSDS technique at international and national conferences/workshops, textile forums, to textile groups and in university courses.
The MSDS Technique
The MSDS technique employs disperse dyes and involves hand printing multiple resists and multiple overprinted layers employing numerous color plates and low relief plant materials. The completed works are rich in color, light, shade, contrast, movement, and depth. The multiple layers also imbue a painterly aesthetic and textural, three-dimensional quality to the finished ArtCloth works. Each print is unique and cannot be replicated.
Disperse Dye Information
Disperse dyes are light fast, wash fast and produce strong hues on synthetics. They are produced in a powdered form and so you must wear a mask when working with the dyes in their powder state. The powders are mixed with very warm to hot water. The intensity of hue is determined by the amount of dye that is mixed with the water; that is, less dye will result in a pale color whilst more dye will result in very intense color. The dyes are transparent (i.e. printing a blue area over a yellow will produce green) and so lend themselves to layering and overprinting to build up rich and complex surfaces as well as create delicate and subtle imagery. The dyes can be intermixed to create your own suite of palette colors - see previous disperse dye posts for more dye information.
Workshop Synopsis
This workshop was organized by the Australian Textile Arts & Surface Design Association Inc. Sydney, NSW Branch. It was held at the Epping Creative Centre, Dence Park on 21st - 22nd May 2022.
My thanks to Sarah Lazarus, ATASDA NSW Branch workshop co-ordinator and her team for their outstanding organizational skills and professionalism in ensuring that the workshop would be a huge success. Thank you Sarah and the team!
This two-day workshop was an introduction to the dye sublimation process (transfer printing) and melded participants experiences as valuable resources to create new artistic landscapes using disperse dyes.
Participants created their own custom dyed fabric using disperse dyes via direct imaging, experimental and layering exercises. They applied painted, textured, printed imagery onto papers with disperse dyes and then transfer printed them to polyester and blended synthetic fabrics to create a suite of color and pattern studies via an iron or heat press. Participants were also introduced to the tutor’s signature MultiSperse Dye Sublimation (MSDS) technique featuring multiple layering and resists employing flora as ‘the thematic’ experience. The MSDS works imbue richly colored, textural, and vibrant 3-dimensional imaging to the cloth surface.
In summary, a fun and exciting workshop, where instruction and experimentation forged the potential of each participant.With these new skills each participant can further enhance their printed, dyed artworks by adding collage, additional layering, applique, hand & machine embellishments etc., to create truly unique ArtCloth pieces. All skill levels were welcome to this two-day workshop.
See the following images and enjoy some of the wonderful pieces that were created over the two days (all images by Marie-Therese Wisniowski unless otherwise stated).
Workshop Participants
 Group Photo.
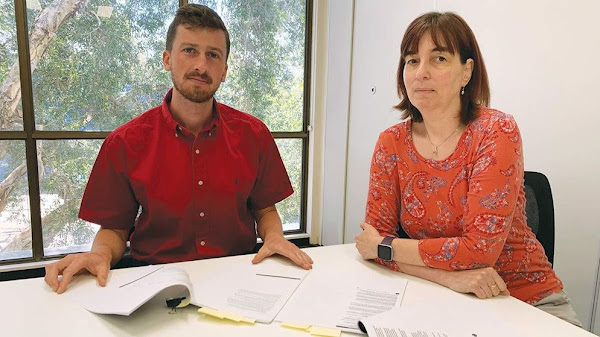
Back: From left to right - Suzanne Walcott, Cathy Griffith, Kathy Hawkins and Vicky Lowery.
Front: From left to right - Sarah Lazarus, Rhonda, Ha, and Tearza Stark.
In Pursuit of ArtCloth: Disperse Dye and Transfer Printing Workshop
Two Day Workshop at ATASDA, Sydney, NSW, Australia
 Workshop Participant: Cathy Griffith.
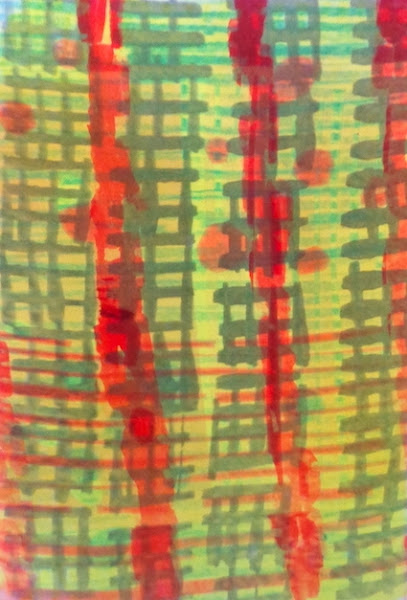
Technique: Multiple resist, layering, texture and color study.
 Workshop Participant: Cathy Griffith.
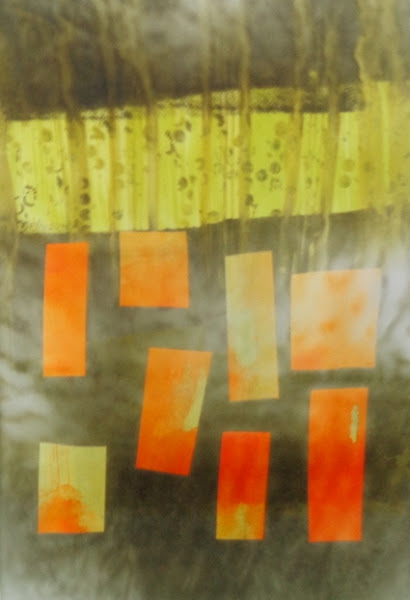
Technique: Design study employing layered imagery on a gradated/color wash background.
 Workshop Participant: Cathy Griffith.
Technique: Personal exploration employing multiple layers, line art, color and texture study.
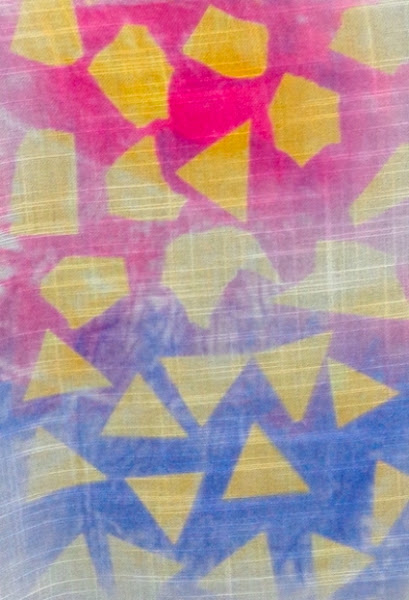
 Workshop Participant: Ha.
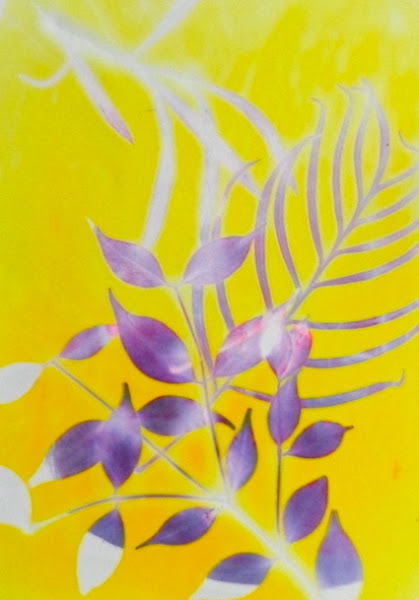
Technique: Color study employing paper stencil resists and layered imagery.
 Workshop Participant: Ha.
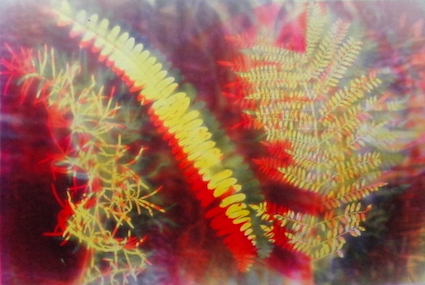
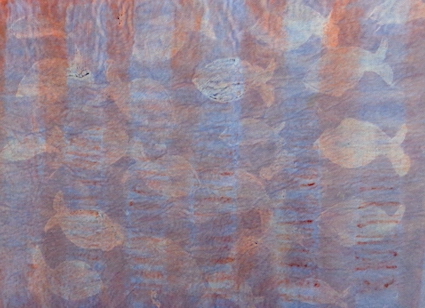
Technique: Multiple resist employing multiple overprinting and colors working from light to dark – MultiSperse Dye Sublimation (MSDS) technique employing flora (Version 1).
 Workshop Participant: Ha.
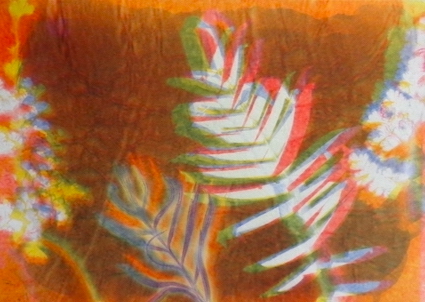
Technique: Multiple resist employing multiple overprinting and out of sequence colors – MultiSperse Dye Sublimation (MSDS) technique employing flora (Version 2).
 Workshop Participant: Kathy Hawkins.
Technique: Design study employing layered imagery on a gradated/color wash background.
 Workshop Participant: Kathy Hawkins.
Technique: Color wash, resist and contrast study.
 Workshop Participant: Kathy Hawkins.
Technique: Personal exploration employing ghost print stencil resists and color wash study.
 Workshop Participant: Rhonda.
Technique: Paper stencil resist, layering and color study.
 Workshop Participant: Rhonda.
Technique: Design study employing layered imagery on a gradated/color wash background.
 Workshop Participant: Rhonda.
Technique: Multiple resist employing multiple overprinting and colours working from light to dark – MultiSperse Dye Sublimation (MSDS) technique employing flora (Version 1).
 Workshop Participant: Sarah Lazarus.
Technique: Multiple resist, layering, texture and color study.
 Workshop Participant: Sarah Lazarus.
Technique: Multiple resist employing multiple overprinting and colours working from light to dark – MultiSperse Dye Sublimation (MSDS) technique employing flora (Version 1).
 Workshop Participant: Sarah Lazarus.
Technique: Multiple resist employing multiple overprinting and out of sequence colors – MultiSperse Dye Sublimation (MSDS) technique employing flora (Version 2).
 Workshop Participant: Suzanne Walcott.
Technique: Paper stencil resist, layering and color study.
 Workshop Participant: Suzanne Walcott.
Technique: Texture, overprinting and color wash study.
 Workshop Participant: Suzanne Walcott.
Technique: Multiple resist employing multiple overprinting and out of sequence colors – MultiSperse Dye Sublimation (MSDS) technique employing flora (Version 2).
 Workshop Participant: Tearza Stark.
Technique: Multiple resist, layering, texture and color study.
 Workshop Participant: Tearza Stark.
Technique: Texture, overprinting and color wash study.
 Workshop Participant: Tearza Stark.
Technique: Multiple resist employing multiple overprinting and out of sequence colors – MultiSperse Dye Sublimation (MSDS) technique employing flora (Version 2).
 Workshop Participant: Vicky Lowery.
Technique: Color study employing negative and positive paper stencil resists, and layered imagery.
 Workshop Participant: Vicky Lowery.
Technique: Design study employing layered imagery on a gradated/color wash background.
 Workshop Participant: Vicky Lowery.
Technique: Multiple resist employing multiple overprinting and colours working from light to dark – MultiSperse Dye Sublimation (MSDS) technique employing flora (Version 1).
This blogspot exhibits many of my students outputs from a variety of workshops. There are one, two and five day workshops as well as workshops that have a different focus. Nevertheless, it always surprises me how much I learn from my students and how enthusiastic they are to learn and so for your convenience, I have listed the workshop posts below.
Visual Communication and Design (The University of Newcastle Multi-Media Course).
The University of Newcastle (Newcastle and Ourimbah Campuses, NSW, Australia) 2008 to 2010.
In Pursuit of ArtCloth:Improvisational Screen Printing Workshop
The Australian Textile Arts & Surface Design Association Inc. Sydney, NSW.
One and Two Day Disperse Dye Workshops
Various Textile Groups (Australia) 2008 - 2011.
Five Day Workshop - In Pursuit of Complex Cloth
“Wrapt in Rocky” Textile Fibre Forum Conference (Rockhampton, Queensland, Australia) 29th June to 5th July 2008.
Five Day Workshop – In Pursuit of Complex Cloth
Orange Textile Fiber Forum (Orange, NSW, Australia) 19th to 25th April 2009.
5 Day Workshop – In Pursuit of Complex Cloth
Geelong Fiber Forum (Geelong, Victoria, Australia) 27th September to 3rd October 2009.
Two Day Workshop - Deconstructed and Polychromatic Screen Printing
Beautiful Silks (Melbourne, Victoria, Australia) 20th to 21st March 2010.
Five Day Workshop – Disperse Dye and Transfer Printing
“Wrapt in Rocky” Biennial Textile Forum/Conference Program (Rockhampton, Queensland, Australia) 25th June to 1st July 2010.
Two Day Workshop – Improvisational Screen Printing
ATASDA (Sydney, NSW, Australia) 28th to 29th August 2010.
Two Day Workshop – In Pursuit of Complex Cloth (Day One)
”Stitching and Beyond” Textile Group (Woodbridge, Tasmania, Australia) 2nd to 3rd October 2010.
Two Day Workshop – In Pursuit of Complex Cloth (Day Two)
”Stitching and Beyond” Textile Group (Woodbridge, Tasmania, Australia) 2nd to 3rd October 2010.
Advance Silk Screen Printing
Redcliffe City Art Gallery Redcliffe, Queensland, Australia) 10th April 2011.
One Day Workshop - In Pursuit of Complex Cloth
The Victorian Feltmakers Inc. (Melbourne, Victoria, Australia) 14th May 2011.
One Day Workshop - In Pursuit of Complex Cloth (Felted and Silk Fibers)
Victorian Feltmakers Inc (Melbourne, Victoria, Australia) 15th May 2011.
Five Day Workshop – Disperse Dye and Transfer Printing
SDA (Minneapolis, Minnesota, USA) 13th to 17th June 2011.
Five Day Disperse Dye Master Class – Barbara Scott
Art Quill Studio (Arcadia Vale, NSW, Australia) 15th to 19th August 2011.
Five Day Workshop – Disperse Dye and Transfer Printing
Fiber Arts Australia (Sydney, NSW, Australia) 26th September to 1st October 2011.
One Day Workshop – Improvisational Screen Printing
Newcastle Printmakers Workshop Inc. (Newcastle, NSW, Australia) 5th November 2011.
One Day Workshops – Low Relief Screen Printing
Various classes within Australia.
Two Day Workshop – Disperse Dye and Transfer Printing
ATASDA (Sydney, NSW, Australia) 23rd to 24th June 2012.
MSDS Demonstration at Zijdelings
(Tilburg, The Netherlands) October, 2012.
Five Day Workshop - Disperse Dye and Transfer Printing
Fibre Arts@Ballarat (Ballarat, Victoria, Australia) 6th to 12th April 2013.
Two Day Workshop - Disperse Dye and Transfer Printing
EFTAG (Tuross Head, NSW, Australia) 13th to 14th April 2013.
Two Day Workshop - Disperse Dye and Transfer Printing
Zijdelings Studio (Tilburg, The Netherlands) 9th to 10th October 2014.
PCA - Celebrating 50 Years in 2016
Art Quill Studio 2016 Workshop Program (Newcastle, Australia).
Image Dreamings: Basic Silk Screen Printing Workshop - Part I
2016 Art Quill Studio Workshop Program (Newcastle, Australia).
Image Dreamings: Basic Silk Screen Printing Workshop - Part II
2016 Art Quill Studio Workshop Program (Newcastle, Australia).
In Pursuit of: Improvisational Screen Printing Workshop
2016 Art Quill Studio Workshop Program (Newcastle, Australia).
In Pursuit of: Low Relief Screen Printing (LRSP) Workshop 2016
2016 Art Quill Studio Workshop Program (Newcastle, Australia).
Art Quill Studio 2017 Workshop Program
2017 Art Quill Studio Workshop Program (Newcastle, Australia).
In Pursuit of: Low Relief Screen Printing (LRSP)
2017 Art Quill Studio Workshop Program (Newcastle, Australia).
In Pursuit of Complex Cloth: Layered Printing Approaches
2017 Art Quill Studio Workshop Program (Newcastle, Australia).
Melding Experiences: New Landscapes Using Disperse Dyes and Transfer Printing.
2019 Art Quill Studio Workshop (NCEATA, Newcastle, Australia).
In Pursuit of ArtCloth: Disperse Dye and Transfer Printing Workshop
2022 Two Day Workshop (ATASDA, Sydney, NSW, Australia).
Image Dreamings: Basic Silk Screen Printing on Cloth Workshop
2025 Two Day Workshop (Newcastle Printmaker's Premises, Newcastle, NSW, Australia).
Introduction
For over two decades I have been experimenting and working with hand printing techniques using disperse dyes on synthetic/polyester fabrics. These experiments led to my signature technique that I have developed and named - MultiSperse Dye Sublimation (MSDS). I have been teaching my MSDS technique at international and national conferences/workshops, textile forums, to textile groups and in university courses.
The MSDS Technique
The MSDS technique employs disperse dyes and involves hand printing multiple resists and multiple overprinted layers employing numerous color plates and low relief plant materials. The completed works are rich in color, light, shade, contrast, movement, and depth. The multiple layers also imbue a painterly aesthetic and textural, three-dimensional quality to the finished ArtCloth works. Each print is unique and cannot be replicated.
Disperse Dye Information
Disperse dyes are light fast, wash fast and produce strong hues on synthetics. They are produced in a powdered form and so you must wear a mask when working with the dyes in their powder state. The powders are mixed with very warm to hot water. The intensity of hue is determined by the amount of dye that is mixed with the water; that is, less dye will result in a pale color whilst more dye will result in very intense color. The dyes are transparent (i.e. printing a blue area over a yellow will produce green) and so lend themselves to layering and overprinting to build up rich and complex surfaces as well as create delicate and subtle imagery. The dyes can be intermixed to create your own suite of palette colors - see previous disperse dye posts for more dye information.
Workshop Synopsis
This workshop was organized by the Australian Textile Arts & Surface Design Association Inc. Sydney, NSW Branch. It was held at the Epping Creative Centre, Dence Park on 21st - 22nd May 2022.
My thanks to Sarah Lazarus, ATASDA NSW Branch workshop co-ordinator and her team for their outstanding organizational skills and professionalism in ensuring that the workshop would be a huge success. Thank you Sarah and the team!
This two-day workshop was an introduction to the dye sublimation process (transfer printing) and melded participants experiences as valuable resources to create new artistic landscapes using disperse dyes.
Participants created their own custom dyed fabric using disperse dyes via direct imaging, experimental and layering exercises. They applied painted, textured, printed imagery onto papers with disperse dyes and then transfer printed them to polyester and blended synthetic fabrics to create a suite of color and pattern studies via an iron or heat press. Participants were also introduced to the tutor’s signature MultiSperse Dye Sublimation (MSDS) technique featuring multiple layering and resists employing flora as ‘the thematic’ experience. The MSDS works imbue richly colored, textural, and vibrant 3-dimensional imaging to the cloth surface.
In summary, a fun and exciting workshop, where instruction and experimentation forged the potential of each participant.With these new skills each participant can further enhance their printed, dyed artworks by adding collage, additional layering, applique, hand & machine embellishments etc., to create truly unique ArtCloth pieces. All skill levels were welcome to this two-day workshop.
See the following images and enjoy some of the wonderful pieces that were created over the two days (all images by Marie-Therese Wisniowski unless otherwise stated).
Workshop Participants

Back: From left to right - Suzanne Walcott, Cathy Griffith, Kathy Hawkins and Vicky Lowery.
Front: From left to right - Sarah Lazarus, Rhonda, Ha, and Tearza Stark.
In Pursuit of ArtCloth: Disperse Dye and Transfer Printing Workshop
Two Day Workshop at ATASDA, Sydney, NSW, Australia

Technique: Multiple resist, layering, texture and color study.

Technique: Design study employing layered imagery on a gradated/color wash background.

Technique: Personal exploration employing multiple layers, line art, color and texture study.

Technique: Color study employing paper stencil resists and layered imagery.

Technique: Multiple resist employing multiple overprinting and colors working from light to dark – MultiSperse Dye Sublimation (MSDS) technique employing flora (Version 1).

Technique: Multiple resist employing multiple overprinting and out of sequence colors – MultiSperse Dye Sublimation (MSDS) technique employing flora (Version 2).

Technique: Design study employing layered imagery on a gradated/color wash background.

Technique: Color wash, resist and contrast study.

Technique: Personal exploration employing ghost print stencil resists and color wash study.

Technique: Paper stencil resist, layering and color study.

Technique: Design study employing layered imagery on a gradated/color wash background.

Technique: Multiple resist employing multiple overprinting and colours working from light to dark – MultiSperse Dye Sublimation (MSDS) technique employing flora (Version 1).

Technique: Multiple resist, layering, texture and color study.

Technique: Multiple resist employing multiple overprinting and colours working from light to dark – MultiSperse Dye Sublimation (MSDS) technique employing flora (Version 1).

Technique: Multiple resist employing multiple overprinting and out of sequence colors – MultiSperse Dye Sublimation (MSDS) technique employing flora (Version 2).

Technique: Paper stencil resist, layering and color study.

Technique: Texture, overprinting and color wash study.

Technique: Multiple resist employing multiple overprinting and out of sequence colors – MultiSperse Dye Sublimation (MSDS) technique employing flora (Version 2).

Technique: Multiple resist, layering, texture and color study.

Technique: Texture, overprinting and color wash study.

Technique: Multiple resist employing multiple overprinting and out of sequence colors – MultiSperse Dye Sublimation (MSDS) technique employing flora (Version 2).

Technique: Color study employing negative and positive paper stencil resists, and layered imagery.

Technique: Design study employing layered imagery on a gradated/color wash background.

Technique: Multiple resist employing multiple overprinting and colours working from light to dark – MultiSperse Dye Sublimation (MSDS) technique employing flora (Version 1).